

Introduction
DPX vPlus is a reliable backup and snapshot management solution that offers seamless data recovery for virtual environments and Microsoft 365. In a previous blog, we provided the steps for How To Use Wasabi Hot Cloud Storage for DPX vPlus Backup Storage. In this step-by-step guide, we will walk you through the process of recovering data from Wasabi Cloud Storage using DPX vPlus. Whether you need to recover virtual machines or Microsoft 365 resources, this guide has got you covered. Let’s get started!
Note : This guide assumes that you have already backed up your data to Wasabi cloud storage and have properly configured DPX vPlus.
Ad-Hoc Recovery of Virtual Machines from Wasabi Cloud Storage
- Open DPX vPlus Dashboard
- __ On the left-hand menu, click on “Virtual Environments” and then “Instances” to access the list of discovered virtual machines.
- __Scroll or use the search bar to find the specific VM you want to recover.
- Initiate the Restore Job:
- __ Click the second button from the right to open the Restore job creation wizard.
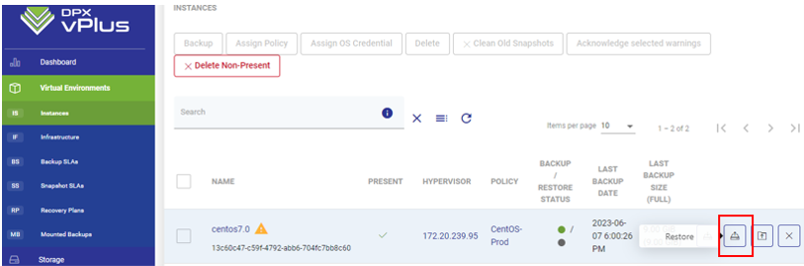
- __ Click the second button from the right to open the Restore job creation wizard.
- Select the Snapshot:
- __ In the Restore Job wizard, choose the snapshot that you wish to recover.
- __ Look for the snapshot ending with the destination that indicates it is stored in Wasabi object storage.
- Specify the Recovery Destination:
- __ Select “Restore to Hypervisor” and choose the hypervisor host where you want to recover the VM.
- Configure the Restore Options:
- __ Complete the restore wizard, following the specific process for your hypervisor.
- __ Depending on your requirements, you may have options to delete the existing VM or change the name of the new VM.
- Start the Restore Task:
- __ Click “Restore” to initiate the task.
- __ Monitor the progress by accessing the “Workflow Executions Console” at the bottom of the screen.
Ad-Hoc Recovery of Microsoft 365 Resources from Wasabi Cloud Storage
- Open DPX vPlus Dashboard:
- __ On the left-hand menu, click on “Cloud” and then “Instances” to view the list of Microsoft 365 resources.
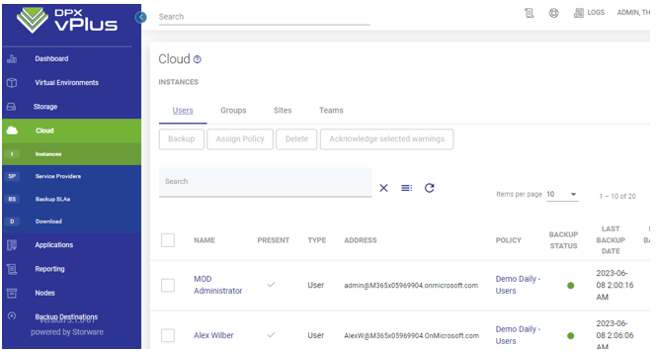
- __ On the left-hand menu, click on “Cloud” and then “Instances” to view the list of Microsoft 365 resources.
- Locate the Owner of the Resource:
- __ Scroll or use the search bar to find the owner of the resource you need to recover.
- Access Protected Data:
- __ Click on the name of the owner to open a new window.
- __ Scroll down until you find the “Protected Data” tab and open it.
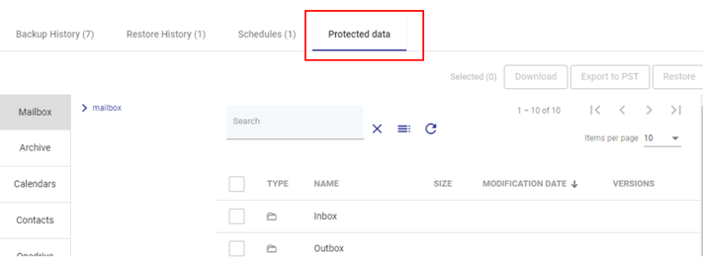
- Select the Application:
- __ On the left side, you will see tabs for each MS application protected for that user (e.g., Exchange, OneDrive, Chats).
- __ Browse through the tabs to find the specific application that contains the resource you want to recover.
- Choose the Restore Option:
- __ Browse through the application (e.g., OneDrive, Mailbox) to find the individual resource you need to recover.
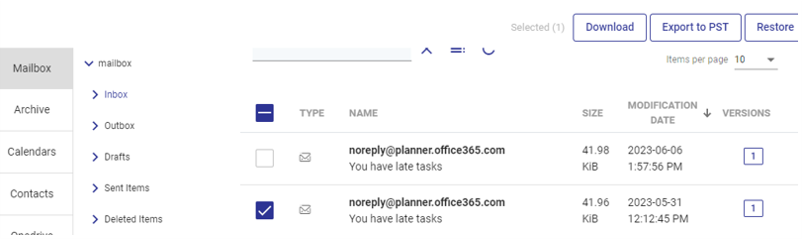
- __ Select the item you want to restore.
- __ Browse through the application (e.g., OneDrive, Mailbox) to find the individual resource you need to recover.
- Restore the Item:
- __ To restore the item back to a location within MS 365 cloud, click the “Restore” button in the top-right corner.
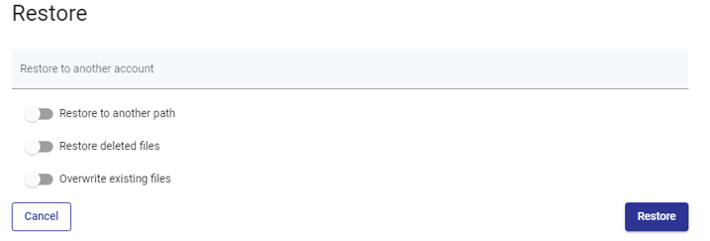
- __ This will open a short Restore wizard where you can specify alternate restoration paths, overwrite existing files, or choose an alternate User, Group, Team, or Site for restoration.
- __ Alternatively, to download the item to your local machine, click the “Download” button in the top-right corner.
- __ Once the download preparation is complete, you can find the item for download under the “Download” section in the “Cloud” tab of the left-hand menu.
- __ To restore the item back to a location within MS 365 cloud, click the “Restore” button in the top-right corner.
Scheduled Recovery Using Recovery Plans
- Open DPX vPlus Dashboard:
- __ On the left-hand menu, click on “Virtual Environments” and then “Recovery Plans.”
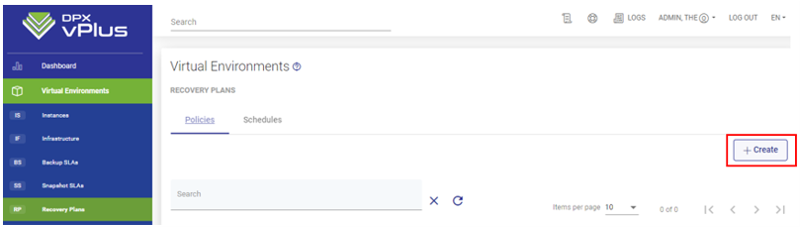
- __ Click the “Create” button on the right-hand side to create a new Recovery Plan.
- __ On the left-hand menu, click on “Virtual Environments” and then “Recovery Plans.”
- Create the Recovery Plan:
- __ Give the new Recovery Plan a descriptive name and click “Save”.
- __ Rules can be added to this plan later.
- Add a Rule:
- __ Scroll down and click “Add Rule” to schedule a recurring restore.
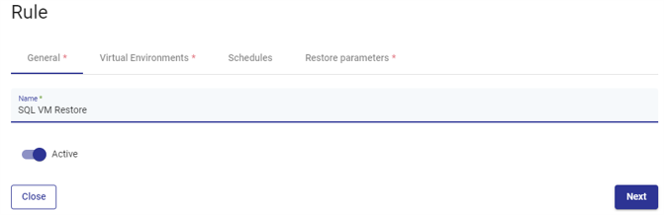
- Configure the Rule:
- __ Provide a name for the rule and click “Next”.
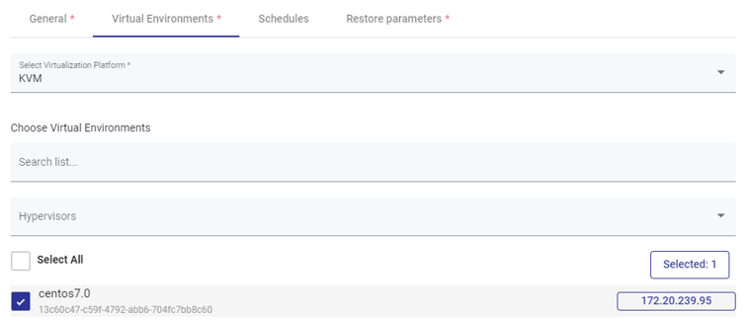
- __ Select the Virtualization Platform and the VM(s) you want to include in this plan.
- __ Click “Next”.
- __ Provide a name for the rule and click “Next”.
- Select or Create the Schedule:
- __ Choose an existing schedule or create a new one that suits your recovery plan.
- __ Click “Next”.
- Define Restore Parameters:
- __ Proceed through the “Restore Parameters” section, specifying details such as the backup to use for recovery, recovery destination, storage, and the name for the new VM.
- __ Once done, click “Save”.
Conclusion
With DPX vPlus and Wasabi Cloud Storage, recovering data from backups has never been easier. In this guide, we covered the step-by-step process for ad-hoc recovery of virtual machines and Microsoft 365 resources. Additionally, we explored scheduled recovery plans to automate recurring restores. By following these instructions, you can confidently recover your valuable data using DPX vPlus and Wasabi Cloud Storage. Contact usfor a demonstration, trial and pricing.
Brian Sietsma
Sales Engineer
Brian is a sales engineer at Catalogic Software, supporting customers with technical guidance on backup and recovery solutions.