


Setting up a reliable Proxmox backup should include more than getting one successful job. You need to know which virtual machines are protected, where their recovery points are stored, and whether you can restore a working VM when it matters.
This guide walks through that process with Catalogic DPX 4.16. You will add a Proxmox VE cluster to DPX, install the required host plugin, create an agentless backup job to vStor, and test a full virtual machine restore. The instructions reflect the current DPX 4.16 Proxmox documentation as of August 10, 2026.
What DPX protects in Proxmox VE
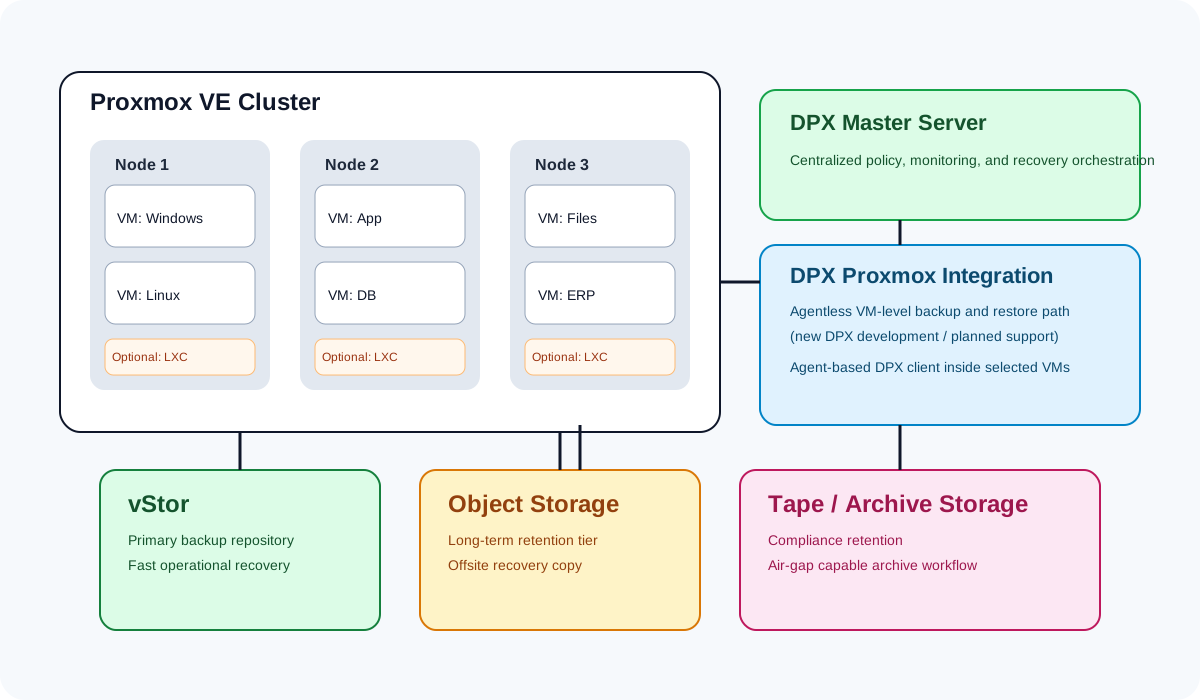
DPX 4.16 provides agentless backup for QEMU virtual machines running on Proxmox VE 8.4 or later. It reads VM data through the Proxmox API and the Proxmox DPX Plugin on the host, then writes the backup to a vStor pool. You do not install DPX software inside the guest virtual machines for this protection model.
The current release supports RAW, VMDK, and QCOW2 virtual disks. LXC containers are not included in agentless Proxmox protection. Proxmox backup and restore jobs are managed in the DPX web interface, not the desktop interface.
If some workloads need application-aware or guest-level protection, you can use agent-based DPX backup alongside the agentless method. The Proxmox backup and recovery solution overview explains when each model fits.
Before you create a Proxmox backup job
Check these prerequisites before opening the DPX web interface:
- DPX 4.16 is installed and available.
- The Proxmox cluster runs Proxmox VE 8.4 or later.
- The DPX Master Server can reach a Proxmox host on the API port. The default is TCP 8006.
- You have either a Proxmox username and password or an API token. The username must use the
user@realmformat, such asroot@pam, and the account must be able to list and back up the intended VMs. - DPX can reach the Proxmox host over SSH to install the Proxmox DPX Plugin. The default SSH port is 22.
- A vStor server and pool are ready to receive the backups.
One Proxmox VE node definition in DPX represents the whole cluster. You enter any cluster member as the connection point, and DPX discovers the other members and their virtual machines. A standalone Proxmox server can be added in the same way.
For current version and disk-format details, check the DPX compatibility page for agentless Proxmox VE backup before deploying the job in production.
Step 1: Add the Proxmox VE node to DPX
Open the DPX Master Server web interface and complete the initial connection:
- Select Nodes in the left navigation.
- Click Add Node.
- Choose Proxmox VE as the node type.
- Enter a unique node name and select its DPX group.
- Enter the hostname or IP address of any server in the Proxmox cluster.
- Keep port 8006 unless the Proxmox API uses a different port.
- Choose Password or API Token, then enter the corresponding credentials.
- Set Verify SSL certificate to match the certificate in use. DPX documentation says to leave it disabled for a self-signed certificate and enable it when certificate verification should be enforced.
- Click Test to confirm that DPX can reach Proxmox and authenticate.
Do not click Add until you review the plugin section described next.
The complete field reference is available in Adding a Proxmox VE Node.
Step 2: Install the Proxmox DPX Plugin
The Proxmox DPX Plugin runs on the Proxmox host and lets DPX read virtual machine data through the Proxmox backup interface. It is separate from a guest agent and does not install software inside protected VMs.
In the Proxmox DPX Plugin section of the Add Node dialog:
- Check the plugin status shown by DPX.
- If the plugin is not installed, select stored SSH credentials or add a new SSH credential.
- Confirm the SSH port. The default is 22.
- Click Add to save the node. DPX uploads and installs the plugin over SSH as part of this operation.
You can add the node without SSH credentials, but a backup cannot run until the plugin is installed. DPX uses the SSH credentials for installation and version checks; the current documentation states that they are not stored in the node definition.
After the node is added, confirm that the cluster and its virtual machines appear in DPX before creating a job.
Step 3: Create the Proxmox backup job
With the node and plugin ready, create the job in the DPX web interface:
- Open Job Manager.
- Click New Backup Job.
- Choose Proxmox as the job type.
- Enter a job name. Proxmox job names can contain letters, numbers, hyphens, and underscores, with a maximum of 64 characters.
- In Sources, click Add Source and select the VMs you want to protect.
- In Destination, select a vStor pool.
- Add one or more schedules if the job should run automatically.
- Set the retention period. DPX uses 90 days by default, and a schedule can override the job-level retention.
- Review the notification options under Advanced Options if job email alerts are required.
- Click Save, then choose whether to run the job immediately.
DPX lets one backup job select VMs from more than one Proxmox cluster. Selecting a parent in the source tree also includes VMs added beneath that parent on a later run. Use that option carefully so new machines enter the intended protection policy.
Select the destination at the vStor pool level. DPX creates a separate vStor volume for every protected VM and seals a snapshot after each successful run. That snapshot becomes the VM’s recovery point.
See Creating a Proxmox Backup Job and Scheduling a Proxmox Backup Job for the full field-level procedures.
How full and incremental Proxmox backups work
DPX uses an incremental-forever workflow for Proxmox VE. The first protected run is a base backup that copies the allocated data for each disk. Later runs transfer changed blocks when valid change tracking is available. DPX makes this decision per disk, so a VM can have a mix of base and incremental disk backups during one job run.
Disk format affects what happens after a VM is powered off or restarted:
| Disk format | Incremental backup | Behavior after a power-off or restart |
|---|---|---|
| QCOW2 | Supported | Change tracking persists, so incremental backup can continue. |
| RAW | Supported | Proxmox removes change tracking; the next backup is a base backup. |
| VMDK | Supported | Proxmox removes change tracking; the next backup is a base backup. |
DPX can also fall back to a base backup when no valid prior recovery point exists, including after the previous recovery point expires. Account for the larger transfer when sizing backup windows for frequently restarted RAW or VMDK workloads.
Step 4: Check the first recovery point
After the first run, review the job in DPX and confirm that each intended VM produced a recovery point. If a job protects several VMs and only some fail, DPX reports partial success. The successful VMs still have valid recovery points, while the failed VMs need investigation and another run.
For a useful operational check, record:
- The job start and finish time.
- The VMs that completed successfully.
- The amount of data protected and the vStor pool used.
- The recovery point date and time for a test VM.
- Any VM that produced a base backup when you expected an incremental one.
A green backup job is only the first half of the test. The next step verifies that the recovery point can produce a usable VM.
Step 5: Restore a Proxmox virtual machine
Use a non-production VM for the first restore test. If possible, restore it to an isolated network or leave it powered off until you have checked its identity and configuration.
- Open Job Manager and click New Restore Job.
- Select Proxmox Restore, then click Next.
- Click Add virtual machines and choose a VM with an active Proxmox recovery point.
- Select a value in Backup Date/Time. Latest uses the newest recovery point available when the restore runs; choosing a specific date and time pins the job to that recovery point.
- Set the restore order if the job contains more than one VM. DPX restores the selected machines sequentially in that order.
- Choose the destination Node name and Target storage. Select the original node and storage for the original location, or different values for an alternate location.
- Decide whether DPX should power on each VM after its restore completes.
- Review the summary, save the job, and run it.
DPX creates a new VM instead of overwriting an existing machine. It reserves a new VM ID and appends a timestamped -restored-... suffix to the original name. This behavior gives you a chance to validate the restored copy before it replaces any production role.
Follow progress in Job Monitor. The official Proxmox Restore procedure covers multi-VM ordering, alternate destinations, job options, and partial-success behavior.
Validate the restored VM
Treat the restore as an acceptance test rather than proof that the job button works. Check the result against a short runbook:
- Confirm that the VM appears on the chosen Proxmox node and storage.
- Review its CPU, memory, disk, and network configuration before powering it on.
- Start the VM in an isolated network when duplicate hostnames or IP addresses could cause a conflict.
- Confirm that the operating system boots and its expected files are present.
- Start the application or service and complete a basic functional check.
- Record the elapsed restore time and compare it with your recovery time objective.
- Keep the test result with the job name, recovery point, destination, tester, and date.
Repeat this test on a schedule. A recent, measured restore gives you better evidence than an old job-success report.
Current DPX 4.16 Proxmox limitations
Keep these boundaries in the design and the recovery runbook:
- Agentless Proxmox protection covers QEMU virtual machines, not LXC containers.
- Proxmox backup and restore are available only in the DPX web interface.
- vStor is the supported destination for this Proxmox backup job type.
- Proxmox VE 8.4 or later is required.
- RAW and VMDK disks need a new base backup after a VM power-off or restart because Proxmox change tracking is lost.
- The documented recovery workflow restores a complete VM as a new machine.
Check the compatibility guide again before an upgrade or a production design change. Product support can move faster than an implementation runbook.
Build the rest of the Proxmox protection plan
This procedure gives you a working VM backup and a tested restore. The broader plan should also define job ownership, backup windows, retention, restore-test frequency, offsite recovery, and how Proxmox fits with the other workloads your team protects.
Use the DPX for Proxmox VE datasheet for a concise product overview, or read Beyond Proxmox Backup Server: When Do You Need More? when comparing a Proxmox-only backup design with a broader data protection platform. The DPX 4.16 release overview covers the other changes in this release.
Proxmox backup FAQ
Does agentless DPX backup require software inside each Proxmox VM?
No. DPX communicates through the Proxmox API and a Proxmox DPX Plugin installed on the Proxmox host. It does not install an agent inside the guest for this backup method.
Can one DPX job protect VMs from several Proxmox clusters?
Yes. The current DPX documentation says a single Proxmox backup job can select virtual machines from more than one cluster. Each protected VM receives its own vStor volume.
Can DPX restore a VM to a different Proxmox node or storage target?
Yes. The restore workflow lets you select the target node and target storage. DPX creates the restored copy with a new VM ID and a timestamped name rather than overwriting an existing VM.
Does DPX 4.16 back up Proxmox LXC containers?
No. Agentless Proxmox protection in DPX 4.16 supports QEMU virtual machines. LXC containers are not supported by this job type.
Is every Proxmox backup after the first one incremental?
Not always. DPX normally transfers changed blocks after the base backup, but it starts a new base when valid change tracking is unavailable. A power-off or restart clears Proxmox change tracking for RAW and VMDK disks, while QCOW2 tracking persists.

Pawel Staniec
CTO
Pawel is CTO at Catalogic Software, where he owns DPX product architecture and technology direction and works with our developers, alliance partners and customers across EMEA to keep what we build aligned with how our data protection products are actually deployed. He writes about the engineering behind our releases, including NDMP backup management, Proxmox VE protection, and where hypervisor-native backup tooling stops being enough.