


If you’re responsible for backups, a verification pass tells you which backup check succeeded. A restore test shows whether you can recover the application, provided you take the test that far. Here’s how I’d separate those results and record a recovery time the application owner can actually use.
I’m quite careful with the word “verified.” A checksum check and a snapshot mount give you different evidence. Recovering a virtual machine (VM) and completing a transaction in its application goes further again. Once all of that becomes a green “passed” in a report, it’s very easy to assume more was tested than actually was.
Backup verification is only as useful as the check it runs
The name of the feature isn’t enough. Some verification jobs check stored data for corruption. Others mount a snapshot. There are also workflows that start a recovered workload and run checks against it. You need to know which of those happened in your environment.
That means reading the documentation and looking at the job results, including the limitations. Then there’s the operational part. If verification fails overnight, someone needs to pick it up and find out why. Having the check scheduled doesn’t take care of that by itself.
In Catalogic DPX 4.16, automatic verification uses vStor to mount a completed backup snapshot as a volume and check that the backup data can be accessed. It is supported for block and VMware backups with vStor as the destination.
DPX also offers a separately controlled GuardMode scan after a successful verification mount. The scan reports suspicious files. Treat its findings as another input to the recovery decision; a completed scan does not establish that an application will start or that a recovery point is free of every threat.
A running VM still needs an application test
With restore testing, the question is how far you took the recovery. Recovering one file is a perfectly reasonable test for a deleted-file incident. Bringing back an application after losing its machine requires more work.
For a granular restore, check the recovered file itself. Open it and confirm you got the version you wanted. A completed restore job with the wrong version of the file still leaves you with the original problem.
For a whole machine, check that the operating system boots on the target you plan to use. Then check its configuration. If you’re testing bare metal recovery, include the recovery environment and the hardware you expect to recover onto. Those are part of the procedure too.
Then there’s the application. The database process can be running while the application can’t connect to it. The login page can load, and the user still can’t retrieve a record. Have the application owner perform a task they actually use the system for, with the recovered data. That’s a much more useful stopping point than “the VM is up.”
Record what passed and what you left untested
I’d keep the last column in the report. Otherwise, the next person reading it has to guess what “passed” means.
| Check | What you checked | What remains untested |
|---|---|---|
| Backup job completion | The job completed; you reviewed its status and logs | Recovery of the workload |
| Snapshot-mount verification | The snapshot mounted and passed the configured accessibility check | Machine startup and application behavior |
| File restore | You recovered the intended file and checked its contents | Recovery of the whole machine or service |
| Machine recovery | The recovered machine booted on the test target | Application usability, unless you checked it separately |
| Application recovery exercise | The agreed business task worked with recovered data | Anything you left outside the exercise |
Even the application test has limits. If it used an identity service that was already running, you haven’t tested recovery of that service. If you restored from local storage, you still don’t know how long the same recovery takes from an off-site tape copy.
Write those exclusions down and cover them in the next exercise.
The restore job measures only part of the recovery time
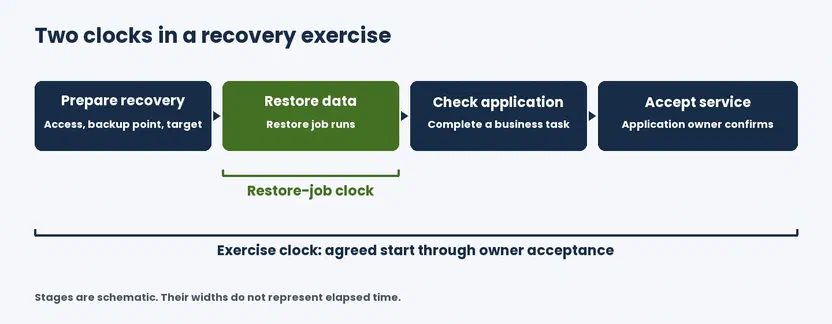
The diagram shows the stages, not their relative duration. Agree on the exercise start before testing; the restore job has its own, narrower clock.
The restore job has a start time and an end time. The person dealing with the incident has work on both sides of it. They need to establish what happened and choose a recovery point. They need access to the backup system and somewhere to restore. Afterwards, someone has to check the application.
The recovery time objective (RTO) is the target time for restoring service after a disruption. If you’re testing against it, agree on when the clock starts. Keep the restore duration, but also record the elapsed time until the application owner accepts the recovered service. Include the preparation that would have to happen during the incident.
The recovery point objective (RPO) describes how much recent data the business can accept losing, expressed as a time window. Check it separately. You can recover quickly from an old backup and still lose more data than the business agreed to lose.
And be honest about the shortcuts. If the destination was ready before the test, put that in the report. Same for credentials the tester already had. Those conditions affect how you can use the measured time in the recovery plan.
Test one workload using the backup copy the scenario requires
Start with one important workload. Pick a failure scenario and agree with the application owner on what they need to see working at the end. Use the backup copy you’d need in that scenario. If the exercise assumes the local repository is gone, restoring from that repository won’t answer the question.
Run it in an isolated environment where the recovered system can’t overwrite production data or trigger production integrations. Keep a note of dependencies that are already available in the test environment.
| Field | Record for this test |
|---|---|
| Workload and owner | Application name and who accepts the result |
| Recovery scenario | What failed and what remains available |
| Recovery point | Backup timestamp and why you chose it |
| Backup source | Repository or media actually used |
| Verification result | Check performed, status, and relevant warnings |
| Destination | Where you restored and what you had to prepare |
| Dependencies | Which services you recovered; which were already running or left out |
| Acceptance check | The task the application owner completed |
| Timing | When the exercise started, when data was restored, and when the owner accepted the service |
| Data-loss result | Latest expected data and latest data actually recovered |
| Manual intervention | What you had to do that wasn’t in the runbook |
| Follow-up | What needs fixing, with an owner and a date to test again |
Keep the job logs with this record and get the application owner’s result in writing. When you need an undocumented step to make the restore work, add it to the runbook and test again. Otherwise, the next person has to work it out from scratch.
A repository move can change the recovery path. So can an application update or a different recovery target. Test again after changes that affect the procedure. How often you run the regular exercise depends on the workload and how much is changing around it.
Leave the next person a recovery result they can use
Keep “backup verified” for the check that actually ran. Alongside it, record what you recovered and which backup copy you used. Include the elapsed time and who confirmed the application worked. List the dependencies you left out.
I’m comfortable with a report that says the application worked, but identity recovery is still untested. At least the team knows where they stand. “Everything passed” gives them very little to work with if nobody can explain what was included.

Pawel Staniec
CTO
Pawel is CTO at Catalogic Software, where he owns DPX product architecture and technology direction and works with our developers, alliance partners and customers across EMEA to keep what we build aligned with how our data protection products are actually deployed. He writes about the engineering behind our releases, including NDMP backup management, Proxmox VE protection, and where hypervisor-native backup tooling stops being enough.